
The following article will assist you when installing the Cheshire Mouldings Reflections Glass Balustrade range of staircase parts. Split into three separate articles, I've listed a table of contents and links below:
- Part 1 - Base Rail and Newel Post Installation
- Part 2 - Handrail and Glass Panel Installation
- Part 3 - Landing Installation (current article)
1 - Introduction
A simple way to renovate your hallway this winter and spring is by installing the popular Reflections range of glass balustrade. Not only is it simple to install for those competent in DIY, but the glass panels will give your room a brighter, renewed sense of space. Forget traditional wooden spindles and opt for something a little more contemporary and modern for your home. The following guide contains installation instructions for the landing section of the glass balustrade.
Here at Blueprint Joinery, we stock everything you’ll need to install your new staircase with ease – glass panels, handrails, base rails, newel posts, fixing kits and more.
Please note, Reflections Glass Balustrade has been designed to suit stair pitches between 40° and 44°. As per the fitting guide, this range is designed for use in domestic situations and will fit most closed staircases with a handrail height of 900mm on the rake and 900mm on the landing.
If in doubt, please phone our office on (01691) 671020 or email us at info@blueprintjoinery.co.uk. We have a team of dedicated expert advisers that are on hand to help you with your latest stair balustrade project; from start to finish.
2 - Tools and Fixings Needed
- Battery drill
- Drill bits including ø3mm, ø7.5mm, ø11mm, ø12mm, ø13mm, ø25mm and ø35mm
- Countersink bit
- Saw
- Spirit level
- Tape measure
- Clear silicone.
3 - Fitting Guide
3a - Landing installation
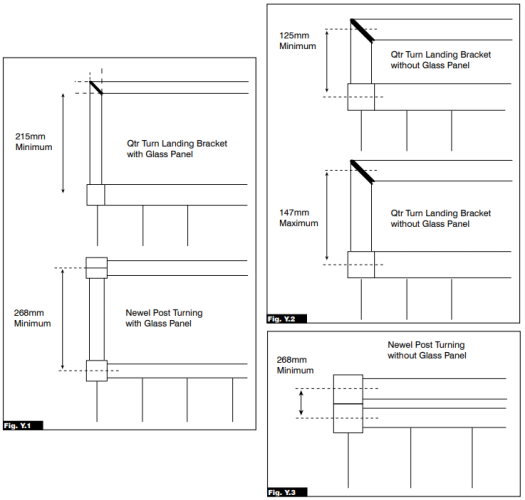
Please note, the maximum distance allowed between newel posts is 2400mm for landings. You will need an intermediate newel post installed for anything exceeding this length.
The height that you should make your newel base is the same as the top of your stairs which is 125mm.
If your landing returns on a 180° angle from your staircase and you are using an 80mm glass landing panel minimum measurements are listed. (See Fig. Y1)
If you are not using an 80mm glass landing panel then your minimum and maximum length of the gap between the join from your newel post to the 90° handrail connector is shown. (See Fig. Y2)
The minimum length of gap between joins if using a newel post to newel post is shown below. (See Fig. Y3)
3b - Landing base rail installation
When installing the base rail on a return:
- Lay your base rails on to the floor in the positions that they need to be in, ensure they are level and the angle on the inside is at 90°.
- Where the two rails cross over draw a diagonal line from the inside corner to the outside corner. This is going to be where you will mitre to join your base rails. (See Fig. Y4)
- Cut and mitre the base rail to length and place in position.
- Drill pilot holes into the grooves of the base rail and countersink so your screw heads will sit below the top of the groove.
- Apply some wood glue to the mitre faces of the base rail and position the base rail on top of your location marks and fix to the floor using screws. (See Fig. Y5)

Follow steps 1 through to 5 above to lay your landing base rail
3c - Landing handrail installation
When installing the handrail:
- Follow the same directions as to how to lay the base rails, cut and mitre to length. (See Fig. Y4)
- Once you have your handrail cut and mitred; take your handrail pieces and at the flat end install your fixing bracket.
- Now take your QTR Turn Connector. (See Fig. Y6) This is going to join your handrails together. You can see on the QTR Turn Connector that there are two arms that are coming out of the centre of the connector. These will sit into the grooves of the handrail and will only fit in one way.
- Firstly, take your QTR Turn Connector and with the arm at the bottom of the connector, slot the smaller of the two arms into the handrail, pilot drill and fix to the handrail. (See Fig. Y7)
- Slot your other handrail piece onto the other part of the QTR Turn Connector. Drill two pilot holes from the bottom and screw to the handrail.
- Now fit your handrail to your newel posts.
Lorem Ipsum is not simply random text. It has roots in a piece of classical Latin literature from 45 BC, making it over 2000 years old. and going through the cites of the word in classical literature, discovered the undoubtable source. Lorem Ipsum comes from sections 1.10.32 and 1.10.33 of "de Finibus Bonorum et Malorum" (The Extremes of Good and Evil) by Cicero,

Lorem Ipsum is not simply random text. It has roots in a piece of classical Latin literature from 45 BC, making it over 2000 years old. and going through the cites of the word in classical literature, discovered the undoubtable source. Lorem Ipsum comes from sections 1.10.32 and 1.10.33 of "de Finibus Bonorum et Malorum" (The Extremes of Good and Evil) by Cicero,
3d - Glass Panel landing installation
- Take a fillet which is cut at your required length (but not more than 99mm long) pilot drill a hole and secure to the base rail.
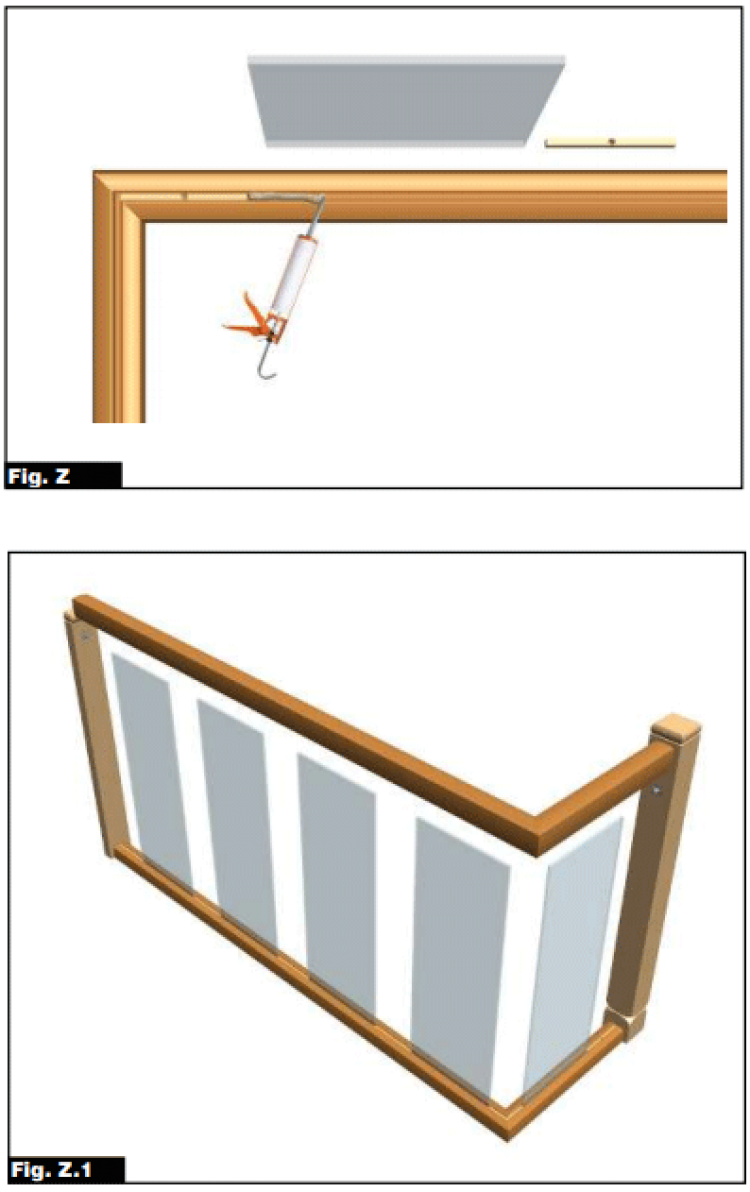
- Take some silicone and squeeze this into your groove. Carefully slide your piece of glass into your base rail sitting flush with your fillet and place flat on the floor of the base rail. (See Fig. Z)
- Repeat this step for all your landing panels.
- Place your handrail into position (this is best to do with two people). Slide it over the Glass panels (See Fig. Z1) and fix to the newel posts.
- Insert the timber fillets into the gaps in the handrail between the panels, pilot drill and secure with a screw to fix.
- To finish off, use the smaller finishing strip cut to the required length and glue onto your wooden fillets between all your glass panels on the landing.
Follow steps 1 through to 6 above to install landing glass panels
4 - Conclusion
With the landing glass panels installed, your stair renovation should now be completed complete. Split into three separate articles, you can find the other 2 articles below for reference or if you need to backtrack:
- Part 1 - Base Rail and Newel Post Installation
- Part 2 - Handrail and Glass Panel Installation
- Part 3 - Landing Installation (current article)
If in doubt, please phone our office on (01691) 671020 or email us at info@blueprintjoinery.co.uk. We have a team of dedicated expert advisers that are on hand to help you with your latest stair balustrade project; from start to finish.