FAQ: How to Fix a Handrail to a Newel Post
Here at Blueprint Joinery, we pride ourselves on our extensive knowledge and expertise that accompanies our fantastic product range of joinery essentials for around the home. One of the areas that have proven most popular with our customers is staircase parts and stair cladding, and we don’t blame them!
Stair cladding is an innovative and inexpensive way of transforming the aesthetic of your staircase without the need to replace it entirely. With your stairs looking brand, spanking new, you’d be doing your home décor a disservice by ignoring the handrail and bannister, but luckily for you, we’ve got you covered.
We stock handrails, newels, and spindles that can be installed to give your staircase that little extra oomph that you’ve been looking for, completing your stairs in style with ease. All of our staircase parts are available in a variety of styles to suit your newly updated stairs and existing interior décor.
If that sounds right up your street, then you’ll be pleased to know that thanks to our Universal Handrail Fixing Kit, it could not be easier to install yourself, with just a drill and a steady hand. The kit can be used with all types of timber.
We’ve got the low-down and ‘how-to’ instructions for you, right here too.
Before you get stuck in, are you ready to start work?
You’ll Need:
Your Universal Handrail Fixing Kit
Newel Posts
Handrails and Fittings
Safety Goggles
A Ruler
A Tape Measure
Combination Square
A Pencil
Drill and Drill Bits (6.5mm / 7.5mm / 12mm / 25mm)
A Tool Box with a 7mm Spanner and 5mm Hex Key
Wood Glue and Masking Tape
You’ll also need another pair of hands as this can be a two-person job!

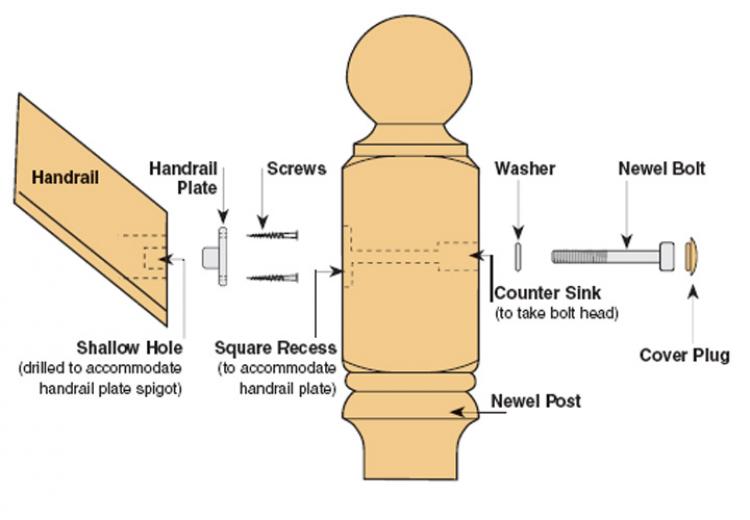
Stair Handrail Fixing Kit - Image courtesy of Traditional Products Ltd
First – Prepare the Handrail
- Measure your handrail twice before you start to ensure it’s the right size. Starting work on the wrong size handrail can be expensive to replace and frustrating, too!
- Take the end of the handrail. Measure the width and mark the centre point with a pencil. Measure the height and mark the centre point. Draw on lines to mark your centre point cross section – X marks the spot!
- Take a 75mm drill bit and mark 65mm with masking tape so you know when to stop drilling. Keeping the drill level by checking from the top and the side, drill your hole until you reach the masking tape. Clear away the dust.
- Now you need to drill a counter-sinking hole inside the hole you just made. Change your drill bit to 12mm and mark 10mm with masking tape, and drill a hole as before.
- Use a 7mm spanner to insert a screw into the handrail, up to the knuckle. Take care and time to ensure this is done without damaging the wood. The hinge needs to be able to move freely.
Second – Prepare the Newel Post
- Measure the width of your newel post, and mark the centre point, as before. Draw a vertical line down the centre of the post. Select your chosen handrail height, and draw a horizontal line through the vertical line. This creates your centre point.
- Continue the horizontal line around to the inside face of your newel post. Measure 25mm to mark another centre point.
- Use a 25mm drill bit to drill a 60mm deep hole on the side of the newel. Ensure this is straight as it will be used for holding your handrail in place.
- On the front side of the newel, use a 12mm drill bit to drill a hole through to the first hole.
- Clean off your pencil marks for a clean and tidy finish.
Finally, Attach the Handrail to the Newel
- Take your fixing nut and, using the hex key, place inside into the hole on the side of the newel post. The flat side should be facing you, and the groove for the screw should be facing the front of the post.
- Take the handrail – you might need some help with this part – and guide the hinge screw into the front-facing hole and into the fixing nut.
- Tighten with the hex key until secure.
- Finish your newly affixed handrail and newel post by applying some wood glue to the matching finishing cover, ensuring the grain is lined up before firmly tapping with a mallet.
If you would like to witness this technique in action, please click here.
And there you have it; it really is that simple.
This method can be used to attach a newel post at the top and bottom of your stairs, as well as at any point on a landing to create a seamless staircase aesthetic that you and your family can enjoy for years to come.
For all staircase parts and more joinery solutions for around the home, please visit our website or contact our team on 01691 671020to discuss your needs.
